Marker”s” Generator Online Released!

Hi.
I released new ARToolKit Marker Generator.
It makes you create original markers for ARToolKit.
When this marker detects two or more marker, you can save all markers as a zip file, or save single marker as a *.pat file.
caution:You need a webcam to play this contents.
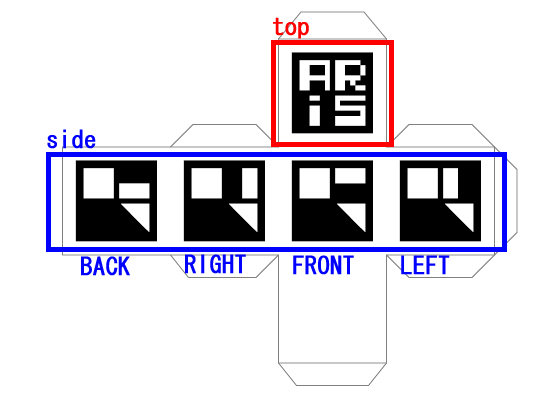
How to use
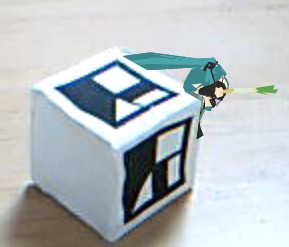
- Design your original markers and print it.
- open ARToolKit Marker Generator Online Multi.
- Set segments and marker size.
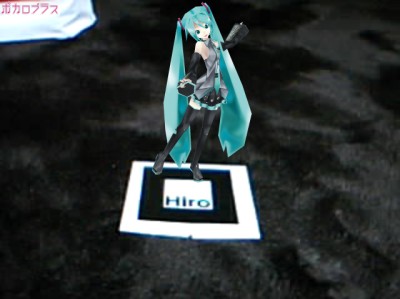
- Point your webcam at the printed markers.
- Push “Get Pattern” button when a red line encloses the markers. and go “save mode”.
- When “save mode” starts, Preview window appears.
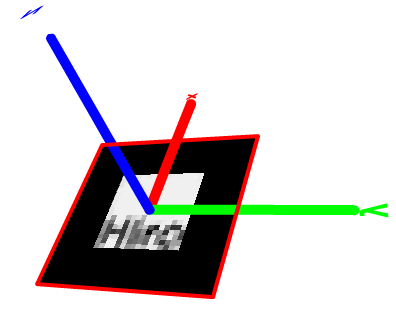
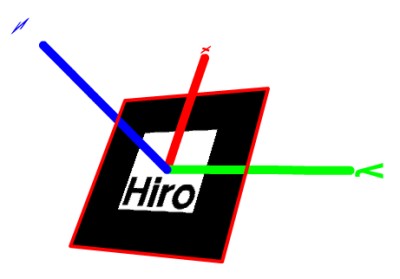
- Red squares show all of detected markers.
- Green square shows the marker in the preview now.
- Preview Window has 6 buttons.
- Push “Prev/Next” button to change marker.
- Push “Delete” button to exclude current previewing marker from target.
- Push “Save All” button to save all pattern file “*.zip”.
- Push “Save Current” button to save previewing pattern file “*.pat”.
- Push “Cancel” button or close window to end “save mode”.
To get source code.
Please SVN check out from here.
http://www.libspark.org/svn/as3/ARToolKitMarkerGeneratorMulti/
Ads
Ad
Ad

Related Article
Ads


Comments
Why does the import image one work? I get no option to “get pattern”
cool tks
Thnx!
But, please, add to your code Mac Camera detection supply.
I used this code:
var index:int=0;
for (var i : int = 0; i < Camera.names.length; i++) {
if (Camera.names[i]=="USB Video Class Video") {
index=i;
}
}
this._webcam=Camera.getCamera(String(index));
Hi, thanks a lot for the english translation.
[…] – Wrapper library by Eric Socolofsky. Marker generator – Print out your marker and use this application to create the .pat file. Blender – […]
Hi, Katun.
Thanks for your code.
I will try it.
Thank you.
Hi, rafa.
Thank you.
Hi, Masamune.
Thank you.
thanks man, this makes life a lot easier. What are you working on now?
Thanks for sharing! Very useful app. Greetings from Belgium.
[…] el código para generarlas lo desconozco pero el generador de marcadores está disponible en esta dirección. Lo importante a la hora de generar el marcador es escoger una imagen que pueda reconocerse desde […]
This looks great, but I’m having no luck yet.
I’ve been trying to make it recognise something like http://en.wikipedia.org/wiki/File:FoafLogo.svg …. eg. by loading a bitmap into an image editor, reducing to 32×32 and 16×16 and printing a high-contrast version. But no success, it doesn’t seem to notice even thick black lines…
[…] http://flash.tarotaro.org/blog/2009/07/12/mgo2/ […]
thanks a lot
can you explain how to use the source code
i want to use the generator offline
thanks again
[…] Online Marker Generator Blender Blender AS3 Export […]
Hi, shani.
Please use this AIR version.
http://flash.tarotaro.org/ar/MarkerGeneratorMulti.air
thanks.
[…] They are online services that will generate this file for you when you upload your marker file, here is one. There is also an air app to do this, available here. 2) The “camera_para.dat” […]
I can’t seem to get the upload an image to work either. Any thoughts?
I couldn’t get the image upload to work either until I saw actual dimensions on Mikko Haapoja’s blog. The outer black square needs to be 80mm x 80mm and the inner white area needs to be 40mm x 40mm. After I did that the program recognized it.
[…] Online Marker generator: http://flash.tarotaro.org/blog/2009/07/12/mgo2/ […]
[…] http://flash.tarotaro.org/blog/2009/07/12/mgo2/ […]
Why I get the pattern button disactivated? How do I make it active?
Gracias ;)
[…] Gerador automático de marcadores para realidade aumentada Muita gente tem nos perguntado como gerar seus próprios marcadores que fazem as realidade aumentadas funcionarem. Dessa forma, segue o link da ferramenta online que utilizamos para esse fim:?http://flash.tarotaro.org/blog/2009/07/12/mgo2/ […]
Hi, Javier.
Button will be activated when marker was detected.
Thank you.
can i create marker without borders?
Hi, miles.
You can create marker without borders by making the background color of the marker a black.
Thank you.
I also need a marker without borders. I tried it with your proposal, which I hopefully understood:
Made a white square on a black paper, printed Hiro into the white square.
Is not detected by the generator.
In your previous version I could use the “Marker Size” slider to capture only parts of the camera image and that worked perfectly for my purpose. This does not work any more.
Can you do something for me ?
Thnx for your great tool.
Hi Tarotaro, I know this not the place for that, but I need help!
Can you help to make my preloader?
I try with each code in the internet, but only preload the AR swf, and not the dae, nor the texture jpg. What can I do? How you do that? embed the dae and the jpg in one as3 project? or load external file?
my preload code right now is this:
stop();
var mcRequ:URLRequest = new URLRequest(“arxample.swf”);
var mcLoad:Loader = new Loader();
mcLoad.load(mcRequ);
mcLoad.contentLoaderInfo.addEventListener(Event.OPEN, onOpen);
mcLoad.contentLoaderInfo.addEventListener(ProgressEvent.PROGRESS, onProgress);
mcLoad.contentLoaderInfo.addEventListener(Event.COMPLETE, onComplete);
function onOpen(event:Event):void {
porcentaje.text = “0%”;
}
function onProgress(event:ProgressEvent):void {
var bLoaded = event.bytesLoaded;
var bTotal = event.bytesTotal;
porcentaje.text = Math.round(100*bLoaded/bTotal)+”%”;
mc_cargando.gotoAndStop(Math.round(100*bLoaded/bTotal));
}
function onComplete(event:Event):void {
porcentaje.text = “”;
addChild(mcLoad);
removeChild(mc_cargando);
}
arxample.swf is the AR application, run very well but :(( this not preload the dae or jpg.
Help me tarotaro, you’re my only hope! :DD
Hi guys,
I got a question
Can i print a marker on a Soda Can?
I am doing a project for a soda company and they want to use augmented reality but they want to use the logo on the soda can as a marker. Can anybody here point in the right direction. Thanks in advanced..
[…] I’m currently looking at learning more about markers; and it’s been pointed out to me that there’s a useful marker generation tool here: http://flash.tarotaro.org/blog/2009/07/12/mgo2/. […]
I get no option to “get pattern”. Why?
Hi, peca.
“Get Pattern” button will become active when you point your webcam at the printed marker.
Thank you.
[…] browse to http://flash.tarotaro.org/blog/2009/07/12/mgo2/ and allow the flash script access to your webcam. Follow the instructions as explained on that […]
If anyone’s having problems with the downloadable version try using the online one. Flash was not recognising my symbols when the downloadable version made them PATs but works now that I’ve saved them online.
[…] and the online marker generator here. […]
[…] to make Pattern-files of your printed Markers: http://flash.tarotaro.org/blog/2009/07/12/mgo2/ (webcam required) Do not change any of the other values on the screen! (16×16px, […]
Thank you for your awesome tool, but for some reason the “Get Pattern” option no longer works as an option when you want to upload a file. One of the great points of your tool was the ability to save paper and not print out markers to create glyphs.
I have noticed many other users are commenting on this and your response is:
“Get Pattern” button will become active when you point your webcam at the printed marker.
This is not what we are asking, we are asking why the upload file is not working anymore. I hope this is clear enough.
Thanks for all your hard work!
The Bart is right!
Solution to “get Pattern” option when uploading file (not from camera) is as stated below by Bart. Thanks!
The Bart says:
January 12, 2010 at 10:19 am
I couldn’t get the image upload to work either until I saw actual dimensions on Mikko Haapoja’s blog. The outer black square needs to be 80mm x 80mm and the inner white area needs to be 40mm x 40mm. After I did that the program recognized it.
@Opie
Thanks for pointing up :D that did the trick. The dimensions are the key.
Hi, Josh Knell.
Could you show your marker?
I want to test it.
The method of recognizing MGO and FLARToolKit is the same.
MGO looks for the marker only once when the image is read.
The marker whom cannot be recognized at this time might not be able to be recognized with FLARToolKit.
hi all, I am novice into AR and suppose to create and display 3 objects or texts and display them on screen by using webcam and markers, I do not know what to do please. any one out there who might help please. The code already created in here and am suppose to change them into 3D as created in 2D, please help anyone thanks. Costa UK
#ifdef _WIN32
# include
#endif
#include
#include
#include
#include
#ifndef __APPLE__
# include
#else
# include
#endif
#include
#include
#include
#include
#include “object.h”
#define COLLIDE_DIST 30000.0
/* Object Data */
char *model_name = “Data/object_data2”;
ObjectData_T *object;
int objectnum;
int xsize, ysize;
int thresh = 100;
int count = 0;
/* set up the video format globals */
#ifdef _WIN32
char *vconf = “Data\\WDM_camera_flipV.xml”;
#else
char *vconf = “”;
#endif
char *cparam_name = “Data/camera_para.dat”;
ARParam cparam;
static void init(void);
static void cleanup(void);
static void keyEvent( unsigned char key, int x, int y);
static void mainLoop(void);
static int draw( ObjectData_T *object, int objectnum );
static int draw_object( int obj_id, double gl_para[16] );
int main(int argc, char **argv)
{
//initialize applications
glutInit(&argc, argv);
init();
arVideoCapStart();
//start the main event loop
argMainLoop( NULL, keyEvent, mainLoop );
return 0;
}
static void keyEvent( unsigned char key, int x, int y)
{
/* quit if the ESC key is pressed */
if( key == 0x1b ) {
printf(“*** %f (frame/sec)\n”, (double)count/arUtilTimer());
cleanup();
exit(0);
}
}
/* main loop */
static void mainLoop(void)
{
ARUint8 *dataPtr;
ARMarkerInfo *marker_info;
int marker_num;
int i,j,k;
/* grab a video frame */
if( (dataPtr = (ARUint8 *)arVideoGetImage()) == NULL ) {
arUtilSleep(2);
return;
}
if( count == 0 ) arUtilTimerReset();
count++;
/*draw the video*/
argDrawMode2D();
argDispImage( dataPtr, 0,0 );
glColor3f( 1.0, 0.0, 0.0 );
glLineWidth(6.0);
/* detect the markers in the video frame */
if(arDetectMarker(dataPtr, thresh,
&marker_info, &marker_num) < 0 ) { cleanup(); exit(0); } for( i = 0; i < marker_num; i++ ) { argDrawSquare(marker_info[i].vertex,0,0); } /* check for known patterns */ for( i = 0; i < objectnum; i++ ) { k = -1; for( j = 0; j < marker_num; j++ ) { if( object[i].id == marker_info[j].id) { /* you've found a pattern */ //printf("Found pattern: %d ",patt_id); glColor3f( 0.0, 1.0, 0.0 ); argDrawSquare(marker_info[j].vertex,0,0); if( k == -1 ) k = j; else /* make sure you have the best pattern (highest confidence factor) */ if( marker_info[k].cf < marker_info[j].cf ) k = j; } } if( k == -1 ) { object[i].visible = 0; continue; } /* calculate the transform for each marker */ if( object[i].visible == 0 ) { arGetTransMat(&marker_info[k], object[i].marker_center, object[i].marker_width, object[i].trans); } else { arGetTransMatCont(&marker_info[k], object[i].trans, object[i].marker_center, object[i].marker_width, object[i].trans); } object[i].visible = 1; } arVideoCapNext(); /* draw the AR graphics */ draw( object, objectnum ); /*swap the graphics buffers*/ argSwapBuffers(); } static void init( void ) { ARParam wparam; /* open the video path */ if( arVideoOpen( vconf ) < 0 ) exit(0); /* find the size of the window */ if( arVideoInqSize(&xsize, &ysize) < 0 ) exit(0); printf("Image size (x,y) = (%d,%d)\n", xsize, ysize); /* set the initial camera parameters */ if( arParamLoad(cparam_name, 1, &wparam) < 0 ) { printf("Camera parameter load error !!\n"); exit(0); } arParamChangeSize( &wparam, xsize, ysize, &cparam ); arInitCparam( &cparam ); printf("*** Camera Parameter ***\n"); arParamDisp( &cparam ); /* load in the object data - trained markers and associated bitmap files */ if( (object=read_ObjData(model_name, &objectnum)) == NULL ) exit(0); printf("Objectfile num = %d\n", objectnum); /* open the graphics window */ argInit( &cparam, 2.0, 0, 0, 0, 0 ); } /* cleanup function called when program exits */ static void cleanup(void) { arVideoCapStop(); arVideoClose(); argCleanup(); } /* draw the the AR objects */ static int draw( ObjectData_T *object, int objectnum ) { int i; double gl_para[16]; glClearDepth( 1.0 ); glClear(GL_DEPTH_BUFFER_BIT); glEnable(GL_DEPTH_TEST); glDepthFunc(GL_LEQUAL); glEnable(GL_LIGHTING); /* calculate the viewing parameters - gl_para */ for( i = 0; i < objectnum; i++ ) { if( object[i].visible == 0 ) continue; argConvGlpara(object[i].trans, gl_para); draw_object( object[i].id, gl_para); } glDisable( GL_LIGHTING ); glDisable( GL_DEPTH_TEST ); return(0); } /* draw the user object */ static int draw_object( int obj_id, double gl_para[16]) { GLfloat mat_ambient[] = {0.0, 0.0, 1.0, 1.0}; GLfloat mat_ambient_collide[] = {1.0, 0.0, 0.0, 1.0}; GLfloat mat_flash[] = {0.0, 0.0, 1.0, 1.0}; GLfloat mat_flash_collide[] = {1.0, 0.0, 0.0, 1.0}; GLfloat mat_flash_shiny[] = {50.0}; GLfloat light_position[] = {100.0,-200.0,200.0,0.0}; GLfloat ambi[] = {0.1, 0.1, 0.1, 0.1}; GLfloat lightZeroColor[] = {0.9, 0.9, 0.9, 0.1}; argDrawMode3D(); argDraw3dCamera( 0, 0 ); glMatrixMode(GL_MODELVIEW); glLoadMatrixd( gl_para ); /* set the material */ glEnable(GL_LIGHTING); glEnable(GL_LIGHT0); glLightfv(GL_LIGHT0, GL_POSITION, light_position); glLightfv(GL_LIGHT0, GL_AMBIENT, ambi); glLightfv(GL_LIGHT0, GL_DIFFUSE, lightZeroColor); glMaterialfv(GL_FRONT, GL_SHININESS, mat_flash_shiny); if(obj_id == 0){ glMaterialfv(GL_FRONT, GL_SPECULAR, mat_flash_collide); glMaterialfv(GL_FRONT, GL_AMBIENT, mat_ambient_collide); /* draw a cube */ glTranslatef( 0.0, 0.0, 30.0 ); glutSolidSphere(30,12,6); } else { glMaterialfv(GL_FRONT, GL_SPECULAR, mat_flash); glMaterialfv(GL_FRONT, GL_AMBIENT, mat_ambient); /* draw a cube */ glTranslatef( 0.0, 0.0, 30.0 ); glutSolidCube(60); } argDrawMode2D(); return 0; }
Hello costa,
You are using artoolkit v2.
I recommend this question to be questioned on the following site.
http://www.hitlabnz.org/wiki/Forum
or
http://www.artoolworks.com/community/forum/
regards,
rokubou
To state that your program simply ‘rocks’ would be understating fact! Thanks be to God for Augmented Reality– yeah!
PEACE.
Hi,
The marker generator is not working, it through a debugger error with Visual Studio 2008.
Can u help me in it.
Regards,
Bishtkuber
[…] just my editing the file playlist.xml. You can even make your own marker, create a pattern at Marker Generator Online , add it to the data folder and just swap out the name of your new .pat in pattern […]
[…] added lots of comments to show whats going on… Dont forget you will need to create your AR Marker first. And get a 3D model to […]
Hey there,
thx very much for sharing this.. great tool! Helped me ALOT.
I have an issue with this tho… I’ve got 4 marker designs, each different shapes.
I only use 1 marker design to activate the AR, but when i try other markers… it still activated.
Do you have any idea why it detects all? when it shud just detect specific marker?
pls help!
thanks!
I’ve tried the “Load marker Image” option to no avail. I’ve tried the 80mm outer & 40mm inner marker size to load per Bart’s suggestion also to no avail, which fascinates me since if you’re loading images (jpgs, pngs, etc), who measures them in mm’s? Images are measured in pixels, mm’s only make sense if you consider pixels/cm or pixels/inch–and since that number can vary, you have no idea how many pixels the marker needs to be. For example, 80mm = 227 pixels at 72 pixels/inch AND 945 pixels at 300 pixels/inch.
I also tried 300 pixels x 300 pixels since I see in the code a default of 300 width & height.
ALL TO NO AVAIL. The “Get Pattern” button remains stubbornly DISABLED when using the “Load marker image” option.
Any help in figuring out how to get this to work would be greatly appreciated.
Thanks,
Stephen
Hey!!!
We’re making a project for our master in videogame development in artoolkit, and your marker generator just saved our lives!}
Thank you SO much!
Keep up the good work.
Bye
[…] ??? ??? ????? ??(MGO2 : Marker”s” Generator Online Released!)? ??. ?? ?? ???? […]